Custom email headers and footers
You can add your own custom header (banner) and footer (privacy/unsubscribe options) to the calendar and event email that is sent from your 25Live calendar. For example, you can create a banner that matches your other business email or printed letterhead, or replace the default CollegeNET privacy/unsubscribe statement in the footer with your own.
In the header and footer, you can use the HTML editor or your own source code to format text, add hyperlinks, insert images and lists, and more.
What you can learn in this topic
- How to add a custom header and footer
- Include variables for user-specific or pre-defined text
- Tips for adding custom HTML code for email headers and footers
Learn more about customizing calendar emails or customizing event emails.
How to add a custom header and footer
These steps assume that you've already published the calendar for which you want to customize calendar and/or event emails. For more information, go to Publish calendars.
- In the 25Live editing environment, display the appropriate calendar, and then click Publish Settings.
- On the Publishing Control Panel page, click the Email tab.
- In the Calendar Email or Event Email section, find the view representing the email type you want to customize, and then click Edit Settings & Styles.
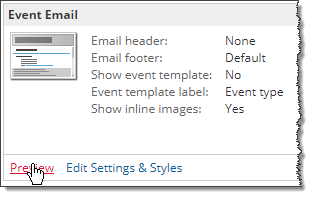
Note In the Calendar Email section, you can switch email views by clicking Switch Calendar Email Views at the bottom. Click Preview to see the layout for each. Calendar Email - Classic lays out event information in a table; Calendar Email - List lays out all event information top-to-bottom, in a list (which can be a good choice for mobile display).
- On the Edit Settings page, on the Settings tab, create a custom header in the Email header section, or a custom footer in the Email footer section.
Note With Calendar Email - List, the footer settings are on a separate tab, Email Footer.
You can either:
- Type the text you want to use directly into the fields.
- Use the HTML editor or your own source code to format the text, add hyperlinks, insert images and lists, and more.
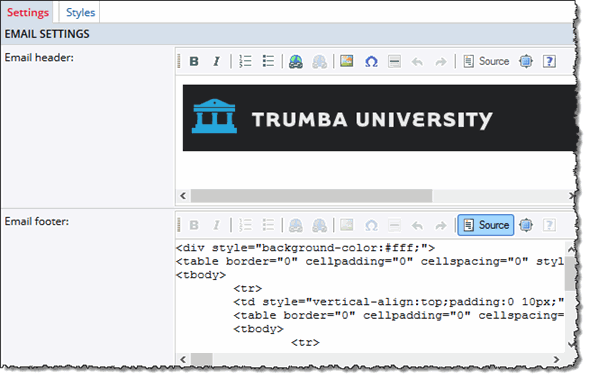
If you're using your own source code, you must click the Source button, as shown in the image below.
or
In the example below, the Email header field contains an image added using the HTML editor Insert Image button, and the Email footer field contains custom HTML source code.
How does the HTML editor work?

To use the default CollegeNET privacy and opt-out information in the footer, shown below, leave the Email footer section empty.

Default CollegeNET privacy and opt-out information.
Important: If you add anything to the Email footer section, thus replacing the default privacy/unsubscribe options in the footer, you must include a variable for the 25Live Publisher opt-out link.
- Test your header or footer every time you make changes. You can send the email to yourself, and then verify (in a variety of common programs) that it looks as you'd expect.
You can also preview your settings by saving them and then clicking Preview at the bottom left of the view section.

For more information, go to Tips for adding custom HTML code for email headers and footers.
- When you're finished adding custom content, click OK.
- Test your email view by using it to send the email to yourself. Fine-tune the custom content if necessary.
Include variables for user-specific or pre-defined text
In the Email header and Email footer sections of an email view, you can use variables to personalize the content for each recipient, add a link to the 25Live Publisher opt-out or email abuse page, and include custom event field names.
When 25Live Publisher sends the email, it replaces each variable in the header or footer with the appropriate content. For example, you can use a variable that inserts the recipient's name or email address.
Where indicated, some variables are available only for a specific type of email (event or calendar). What's the difference between calendar mail and event email?
{EmailOptOutUrl}
Important The {EmailOptOutUrl} variable is required in the Email footer section if you add your own custom content.
Enters the URL of the page on 25Live Publisher where recipients can unsubscribe from messages that are sent from your 25Live calendar (including reminders and other event email). We recommend that you use this variable as the destination of a hyperlink, for which you can create your own link text.
Example
<p>To unsubscribe, <a href="{EmailOptOutUrl}" target="_blank">click here</a>.</p>
{custom:custom_field_name}
Available only for event email. Displays the value of a custom field that you specify.
In the example below, assuming you have the custom field "Age Restrictions" set up with a value of "All Ages" for the event, the recipient sees "This event is for All Ages."
Example: This event is for {custom:Age Restrictions}.
{SubmitterDisplayName}
Displays your name as you define it in your 25Live account settings.
{RecipientDisplayName}
Inserts the recipient's name as it appears in your email distribution list, or as the recipient enters it in the Your name field of an event action form.
{RecipientEmail}
Enters the recipient's email address.
Example: You are currently subscribed as {RecipientEmail}.
{TrumbaUrl}
Enters the URL of the home page on the CollegeNET, Inc. website.
Tips for adding custom HTML code for email headers and footers
- The default footer includes a blue border, which you can't change unless you modify the code. If you submit custom content without specifying the background or border color, the footer displays the same background color as the rest of the message.
- Create <div> containers to keep your header or footer separate from other email content. This is also the best way to define any styles that you want to apply to the entire header or footer rather than having to define them for each paragraph separately.
-
You can use any of the URL variables inside an <a href> tag as the destination for a link, so you can define your own text. For example:
<p>No longer want to receive these messages? <a href="{EmailOptOutUrl}" target="_blank">Unsubscribe.</a></p>Tip If you use the variable as the destination of a link, include the
target="_blank"property in your a tag to increase the chances that the destination page opens properly from a variety of email clients and services. - Some email clients may not support CSS styles or honor properties, such as absolute positioning, that browsers do. Note also that most email clients don't support embedded JavaScript.
