When you're ready to add events to the calendars that you want to publish to your website, you can rename and set up the default calendar and create as many new calendars or sub-calendars as you need. (See also: Using sub-calendars.)
Tips
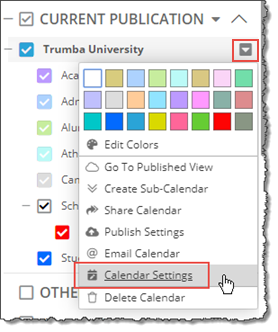
Calendar context menu
Tip You can keep your calendar names shorter by leaving off the unnecessary word calendar. For example, you might name a calendar Community Events rather than Community Events Calendar.
 ) and Learn more... links in the form.
Default all day If most of the events on this calendar will be all-day events, select Yes. That will save event creators from having to select the all-day option with almost every event they create. Otherwise, leave No selected.
Default duration Select the default duration (in hours and minutes) for events.
Important You can control where other CollegeNET generated email replies are sent in publish settings. See Why and how to prevent calendar and event email replies.
Tip You can keep your calendar names shorter by leaving off the unnecessary word calendar. For example, you might name a calendar Community Events rather than Community Events Calendar.
) and Learn more... links in the form.If you want events you add to this new calendar to appear on one or more of the published calendars, select the calendar name(s).
Default all day If most of the events on this calendar will be all-day events, select Yes. That will save event creators from having to select the all-day option with almost every event they create. Otherwise, leave No selected.
Default duration Select the default duration (in hours and minutes) for events.
Important You can control where other CollegeNET generated email replies are sent in publish settings. See Why and how to prevent calendar and event email replies.
The calendar you just created becomes the active calendar, ready for you to add events.